Spelling activities away from the computer
This section suggests a wide range of off-computer activities to help build spelling competence, throughout the stages described in The Spelling Route. The development at each stage is discussed, so it may be helpful to link that background to the relevant activities given in this section.
Early Experience of Words, Sounds and Letters - Activities for Stages 1 and 2
These activities link to Discovering Words: reading and spelling are inseparable.
Early understandings about words, sounds and letters
· Make sure as you read, that the children can share your view of the page.
· Children love unusual words (didgeridoo, Igglepiggle, bommiknocker, Makka Pakka, for instance). Emphasise these words as you read them, roll them around in your mouth. Children take such pleasure in repetition: get the children to say them with you.
· Use the term 'word' as you comment; the pupil needs to get a grasp of what we mean by 'a word'.
· Children love rhyme. Encourage them to spin further rhymes from the words.
· Make good use of books which contain lots of repetition. Make sure you point to the repeated phrases as you read them.
· From time to time, run your finger from left to right under the words you're reading; sometimes read a few words very slowly, and point to each word as you read it.
· Point to interesting letter patterns as you say them: e.g. Double letters (boo! bees buzz), runs of repeated letters (grrrrr! zzzzzzz); and point to capital letters for names.
· Point out when the print is telling you to read differently: e.g. bold, italics, capitals, punctuation marks.
As the learner's development progresses
· Be alert to words the pupil is beginning to recognise e.g. names, TV slogans, brand names; draw attention to them when they crop up.
· Of course it's OK to use books with some 'hard' words. It is often these words which pupils first learn to recognise. (You can have more fun with stegosaurus than with was.)
· Help pupils to notice the letter patterns which some rhymes share (wall, fall).
· Praise pupils when they spot words with the same letter patterns: "That's in my name: Emma Summer."
Foundation of sight vocabulary
· Through the kind of book experience described above, pupils are repeatedly meeting words which crop up frequently (High Frequency Words). Some words will begin to stick in the pupils' memory; a sight vocabulary is beginning to be built. ('Sight vocabulary' means those words which a reader recognises immediately on sight, needing no letter-by-letter decoding.)
· You can add to pupils' tendency to remember some whole words by sight by pointing out the forest of signs in which we live and move: street and road names, bus signs, PUSH/PULL, OFF/ON, the H and C taps, 'Weety Snax', HOSPITAL, POLICE. You can label cupboards and drawers at home, names on bedroom doors, the WELCOME mat.
· In these ways, through books and environmental print, the foundation is being laid for Look & Learn activities.
Early Look & Learn activities
The memorisation of a sight word does not bring with it the instant ability to spell it. A learner may well read a word; the ability to spell it quite often doesn't follow.
Learners can be productively nudged forward towards making a reading/spelling link through encouragement to have a go at spelling a handful of words the learner's own name, of course, and names of significant others: mum, dad, Jo-Jo (the cat!), etc. Using plastic letters is one excellent, fun way to do this.
But generally, learners at this early stage are not ready to begin any serious Look & Learn routine. However, if a learner does show an interest in memorising words for writing, then please have a look at The cluster of skills that is spelling, What is involved in Look & Learn?, and Activities using the Look & Learn approach.
The beginnings of writing
Finally, all the while make sure pupils have the wherewithal to freely draw and 'write'; welcome their version of 'writing'. Also, include them in day-to-day writing tasks such as making the shopping list and signing a birthday card.
Beginning to Develop Phonic Readiness - Activities for Stage 2
All the activities aimed at developing phonic readiness are foundation activities for the Listen & Build approach.
These activities link to the first four stages of the development of phonic readiness that are outlined in Stage 1 of the Spelling Route - Discovering Words.
It is very important to realise that these activities are quite separate from any attention to letters and written spellings.
Stage 1: simply relishing the sounds of words
This comes well before the learner needs to be aware of print, but does come from lots of opportunities to hear stories and rhymes, full of interesting and pleasurable words:
· Onomatopoeic words like splish, splosh
· Memorable rhymes like "Hairy Maclary from Donaldson's Dairy"
· Alliterative rhymes like "Lucy Locket lost her pocket".
The section on Reading and spelling are inseparable is very relevant here.
Stage 2: knowing what is meant by rhyme
1. Able to recognise a rhyme, able to say when words don't rhyme, able to make a rhyme. For this, play games, such as bringing the pupil in to complete the rhyme/s: "I'm going to bake. I think I'll bake a ----"(?) (cake), "I saw a mole, he was digging a ----"; such as, appreciating the joke in "Humpty Dumpty sat on the wall, Humpty Dumpty had a great bish-bash-bosh", etc. Have fun, lark around!
2. Understanding what a rhyme is. This develops gradually and naturally from all that previous experience, as enjoyment in the sounds of words shades into game-like conversations such as these:
· Recite two lines of a rhyme, stopping before the rhyming word for the child to chime in: "Humpty Dumpty sat on a wall / Humpty dumpty had a great ----?"
· Invite other suggestions for that missing rhyme "had a great ball, shawl, crawl, stall etc." (As said, this stage pays no attention whatsoever to the spelling!)
· Raise a laugh by substituting a word that doesn't rhyme: "Jack and Jill /Went up the (pause) stairs."
· Make a picture-collection of Things That Rhyme: bed, shed, red, head, bread, thread; or ask children to make their own drawings of rhymed words.
· Ask children to spot the odd-one-out, the non-rhyme: bed, shed, red, head, bread, cake, thread.
Stages 3 and 4: being able to distinguish the onset
Once learners have developed the ability to hear rhymes, they have an implicit awareness that the rhyming part of the word (or "tail") is separate from its beginning i.e. the onset, or "top". Various activities support this development:
· Play I-Spy (you may need to collect appropriately initialled objects). The games could progress from words with single consonant onsets (top, tap, teddy, table), to onsets with adjacent consonants (train, tree, triangle, tray).
· Play list-games, of the "I went to market" kind: "I went to market and I bought a box, a bed, a bee, a bicycle."
· Invent alliterations: The clapping clown climbs the cliff.
· Make a picture-collection of 'Things That Share a Top', or ask children to make their own drawings of such things.
· Ask children to spot the odd-one-out, from the "tops" of: dog, duck, dinner, supper, dad, dolphin etc.
Completing Phonic Readiness - Activities for Stage 2
These activities link to the section Phonic readiness grows step by step. Phonic readiness is all to do with listening to words and sounds. Activities in the final stage of developing phonic readiness promote the ability to distinguish and "juggle" the separate sounds in a word. That is, we need learners able to distinguish a vowel sound separately from its surrounding consonant; to "hear" the middle sound of a three-letter word made of a consonant-vowel-consonant e.g. cat (a CVC word).
Fuzzy stage boundaries: shared learning between the Spelling Route's stage 2 and stage 3
Towards the end of the development of phonic readiness work begins on knowledge of letter-sound matches. So the activities given here introduce some attention to letters, and written words. Specific activities for learning letter-sound matches are listed in the next set of activities, for stage 3 of the Route).
But first, here are some ideas for activities in which learners practise distinguishing and 'juggling' the separate sounds in a word:
Distinguishing and 'juggling' sounds by ear (no written words involved)
· Play Spoonerisms: for example, turn "Take a shower" into "Shake a tower", or "Keen as mustard" into "Mean as custard."
· Play "Switch the Phoneme": begin with challenges to the first and last phonemes (leave the medial phoneme for last):
o For instance, challenge learners to say cap, then to swap its first phoneme for another: -ap→ map, tap, lap, gap, nap.
o Next, play with the final phoneme; for instance, challenge learners to say man, then to swap its last phoneme for another: ma- → mat, map, mad.
o Finally, the middle phoneme challenge; ask learners to say pan, then swap the vowel phoneme in the middle for another vowel: p-n → pen, pin.
o At first, switch the phoneme is made easier by having some picture support: for instance, learners can see a pan, pen and pin while manipulating their sounds.
o This "Switch the Phoneme" game continues, of course, in visible forms in the next set of activities, where actual letters are manipulated.
Distinguishing and 'juggling' sounds by manipulating letters
And now is the time to introduce the idea that sounds are represented by letters. In meeting this idea, the learner is actually meeting phonics. (This stage is actually the cross-over from phonic readiness into phonics. Ideas for teaching letter-sound matches are described below, in the heading Learning letter-sound matches, and under the activities which follow that section).
Once some early simple letter-sound matches have been introduced, the next step is to support the oral 'juggling' by physical demonstration: moving around the actual letters representing the sound.
You could use resources such as these
· Word wheels: two circular cards, one smaller than the other, fastened through their centres by a paper fastener. The larger, outer wheel shows some rimes e.g. -an, -ap, -ot. The inner wheel shows some onsets, e.g. p-, m-, h-, t-, r-. Turning the wheel aligns the onsets and rimes to make several words, one by one pan, pot, man, map, hot, tan, tap, ran, rap, rot.
· Word slides: a postcard with two parallel lengthwise slits, across which a strip of card may be threaded, so that it slides up and down the postcard. Down the side of the left-hand slit, the card shows a short list of onsets; one example might show h-, k-, f-, s-. Written on the sliding strip is a rime which goes with those onsets; for h-, k-, f-, s-, the rime could be -it. Slide the strip to demonstrate the making of several words: hit, kit, fit, sit; or allow the learner to try out what can be made. A similar resource could have rimes on the right-hand side of the slits (for instance, -un, -at, -um, -ip), and an onset on the sliding strip (for instance, s-).
· Three cube-shaped beads labelled on each face with different letters, threaded on skewers. Use vowels on the middle cube. Spinning the cubes may (or may not!) create words.
· Letter fans: made by fixing together several strips of card, using a paper fastener. Each card bears a letter (or grapheme) on its free end. Letters then can be shown, and others hidden, to make words.
· With letters on small cards, or even on sticky labels for a more permanent piece of work, put the appropriate vowel into the middle space of a word beneath its picture. For example, a set of pictures showing a pan, a pen, a pin, each labelled beneath as p-n.
Or you could do this as a spoken exercise, without pictures. Learners have the words, as p-n, etc. and you say each word for them to add the appropriate letter-card, or sticky label.
And there will be some learners now ready to tackle this as a written exercise, writing the missing letters into the gaps.
Or, importantly, you could use plastic letters
Plastic letters, magnetic or otherwise, are a most excellent resource for all the above ideas, (especially good for "Switch the Phoneme"). They are so extremely useful and versatile, because:
· They turn the invisible idea of word-making into a visible, practical task.
· They give the learner graspable control over otherwise mysteriously intangible sounds.
· They bring about discoveries, as learners experiment with letter combinations.
· They are colourful and attractive.
· They are easy to slide around.
· They're forgiving: errors disappear, without crossings out.
· They remove the extra task of letter-formation.
· Using them feels like playing a game.
However, an idea to keep in mind, especially for those needing extra support: sometimes wooden letters may work better. The feel of the wood helps some learners, those whose learning style favours the tactile.
Matching Letters and Sounds - Activities for Stage 3
The activities in this section are all Listen & Build activities. They bring us to development that is discussed in What is Early Phonics. This section is dedicated to learning phonic facts: the learning of letter-sound matches. It links to Learning letter-sound matches in Early Phonics.
You'll find activities to promote phonic skills in Activities for stage 3, Spelling Route: learning to build and blend.
Step 1 in learning a letter-sound match: the match is 'discovered'
· Most learners in the beginning-to-middle stages of learning phonics need letter-sound matches to be pointed out to them.
· One way is to introduce the letter in isolation, separated from any word, and saying its sound.
· Or you can find a suitable word and focus attention on the letter-sound match in various ways that fit with the learner's maturity level.
· Of course, an excellent way is to present it in an interesting context: memory is helped by associating the letter-sound match with a memorable setting.
Step 2: constant opportunities to meet that same letter-sound match in other words
Pick and mix from these typical activities:
· Learners collect objects beginning with, or containing, the letter-sound match.
· They draw pictures of things beginning with, or containing, the letter-sound match.
· The match is pointed out on an alphabet frieze.
· It's incorporated into I-spy games, odd-one-out games, etc.
· Relevant words are listed in the learner's individual vocabulary-book/glossary.
· Learners have a list of selected words. Ask them to put a red line under words beginning with (let's say) s; then: "Now put a green line under words beginning with m" (or whatever is your current target).
· Learners have a page of randomly scattered letters in different fonts and upper & lower cases. Ask (e.g.): "Put a circle around every letter m".
· Learners have a sheet of newsprint and a highlighter pen. Ask (e.g.) "Put a blob of colour on every letter".
· Use various apparatus to group together matching letters, as written on cards, perhaps, or using plastic letters. For instance, sort a heap of mixed letters, perhaps, say, m, t, and a, into appropriate destinations: post-boxes, sorting trays, pegboards, etc. Phoneme frames are another useful resource; that is, boards (say, mini whiteboards) marked with a grid appropriate to the number of letters to be sorted.
Step 3: a wide range of activities to practise and consolidate that learning
Once a number of letter-sound matches have been learned, there is a wide range of activities to practise and consolidate that learning. The suggestions here are useful in the early stages of learning the letter-sound matches; they are tactile, full of movement, game-like. As learning progresses (and becomes more print-based e.g. workbooks, etc.) they will be needed less and less.
Pick and mix from these typical activities:
To consolidate the memorisation of letter-sound matches
· Fishing for Sounds: cut out some card fish shapes. Clip a paper clip onto each fish tail. Stick a freezer label, with letter written on, onto each fish (that lets you re-use the fish for other words, stuck over the top, another time). Then you need a stick, some string, and a magnet, to make a fishing line. The 'fisherman' must say the sound of each fish caught.
· Pin the Tail on the Donkey: the traditional game, but with the donkey marked out into zones, each bearing a letter. Player must say the sound of the space he or she pins.
· Spin the Skittle: with a circle of letters on cards, a player spins the skittle and must say the sound of the card indicated when the skittle stops.
· Scoop the Biscuit: with wooden or plastic letters in a box or biscuit tin, players reach in to identify a letter from its shape, and say its sound.
· Letter-bingo: with bingo cards marked with letters, not numbers; one activity has a caller calling out the sounds, another has the caller calling out the letter-name; vary according to your teaching aim. A 'matching' element can be added by replacing the players' counters with small cards bearing the target letters.
To practise making letter-sound matches
· Find the Letter (for two players, a caller and a responder): players sit opposite each other, with a rack of cards set up between them; cards have a picture on one side for the caller and a letter on the reverse for the responder. The caller calls out either the full name of pictured object, or its initial sound; the responder must pull out the correct card.
· Portholes (for two players, a caller and a responder). A4 sized cards have a few pictures on one side, for the caller; beneath each picture a 'porthole' has been punched out. On the reverse, for the responder, the initial letter of each picture is written directly below its 'porthole'. The caller calls either the name of the pictured object, or its initial sound, and the responder must push a pencil through the correct porthole.
· A variety of resources that allow the matching of pictures to letter-labelled destinations (trays, boxes, dishes, 'post-boxes', etc.).
And some ideas for playground games
· Hopscotch, with letters in place of numbers: players cross the grid saying each sound as they land on it.
· Cross The River: 'stepping stones' laid out, each with letter/s; players can say each as they land on it, or can be given a word which their steps must make.
· Stations: players seated in a circle, each holding up letter/s; player in middle calls out two sounds; those players must change "stations" before caller manages to take one of their places. Or rather, the caller could call letter-names vary according to your teaching aim.
· Bean bags (can be team game): A floor space marked out jigsaw-fashion, or as a grid, with letter/s in each space; players must say the sound (or name) of the letter in the space on which their bean bag lands.
Writing, as practice in making letter-sound matches
At some point during Early Phonics, and according to their maturity and readiness, learners get to grips (literally) with writing letters.
· Throughout Early Phonics, commercial paper-and-pencil resources are plentifully available: for learners ready to cope with them, to consolidate the learning of letter-sound matches; connecting a picture with relevant letter/s; tracing over or writing-in the relevant letter/s etc.
· Or you can provide your own custom-made paper-and-pencil activities. For instance: learners have a two-column sheet, with selected letters in the first one. Say (e.g.) "Listen to the first (or last, or middle) sound in rain, find its letter/s on your list, and then copy it for yourself in the column next to it." (Or, as an earlier activity, "trace over it".)
Note: So far, the activities suggested for learning letter-sound matches have made no specific reference to those matches in which the written half of the match (the grapheme) is made up of more than one letter: digraphs, trigraphs and quadrigraphs. The procedure for teaching these is just the same as for single letter matches. However, there are certain points to be made and these appear in Letter-sound matches beyond single letters.
But before that, it's probably useful to think about the skills of building and blending.
Learning to Build and Blend - Activities for Stage 3
With this set of activities we are still in Early Phonics, still concentrating on developing Listen & Build tactics, and here focusing on phonic skills rather than phonic facts. So we're looking at what is outlined in the cluster of skills that is spelling.
Learners now need to know how to carry out the task of 'spelling', by bringing together several sub-tasks: they have to keep a word in mind, distinguish its sounds, hold those sounds in memory, and represent them with their proper letters in the proper order. In other words, they are learning segmentation (distinguishing a word's individual sounds) and re-assembly (putting sounds together to make a word).
Helping learners to understand and talk about building and blending
The terms you use
This area of building and blending gets talked about via various terms. There are the traditional classrooms terms: blend and build, along with a range of phrases such as break it up, break it down, listen to the sounds, pick out each sound. To these are added rather more recent terms: segmentation and re-assembly; and analysis and synthesis.
Learners certainly need to know what tasks they must carry out. For this, probably the most straightforward terms for young learners (perhaps any learners) are pick out each sound (through listening), build, and blend. Applying the terms appropriately helps learners understand their own actions:
· Building is the assembly of a whole word from its component sounds.
· Blending in its narrow sense is the running together of adjacent consonants in reading. In a broader sense it refers to running all the word together, vowels and consonants. That kind of blending is a part of spelling in so far as the spelled word must be checked by reading it, once it has been built in writing.
· Segmentation in the first place is a listening task which distinguishes each sound in a word (in other words, pick out each sound); it also includes physically splitting up the written letters of a word (perhaps using plastic letters, for example, or in some way 'chopping up' a written word, using pencil strokes, scissors and so on).
· Re-assembly is self-explanatory: the re-creation of a word from its components.
· Synthesis covers building, blending and re-asssembly.putting a word together.
· Analysis is segmention.
You will know your own learners, and you will know which terminology will best help them understand and talk about these processes.
Some tips to help learners understand blending and building
· Most learners are helped by spoken demonstrations. They need to hear a word pronounced in slow-motion, each phoneme dragged out. After which, they need to hear it pronounced normally.
· Pronounce the word in a whisper: this largely cuts out the schwa sound that can get in the way. (The schwa is that 'uh' sound which attaches itself to consonants, for instance, turning b-l-a-ck c-a-t into 'buh-luh-a-cuh cuh-a-tuh.')
· Accompany your spoken demonstration with visual demonstration plastic letters, phonemes on cards, letter fans, etc.
· Be careful to use the terms (blending, building, etc.) with precision.
Plastic letters again invaluable
The main arena for the development of the skills of segmentation and re-assembly is plentiful experience of physically making words. Learners by now will already have had some practice in these skills; earlier activities have already been described, in the sections above headed Distinguishing and 'juggling' sounds by ear and Distinguishing and 'juggling' sounds by manipulating letters.
Here, as Preparing for Phonics ends and Early Phonics begins, the overlap of the two stages means that all those ideas for physical demonstration continue to be useful: the activities with plastic letters, and similar resources.
But learners can now be moved on
Now learners are ready for practice in actual spelling, more advanced practice than in stage 2, learning to be independent in their segmentation and re-assembly of words.
In such practice, plastic letters again are invaluable, as in the following beginning-spelling activity:
· Make sure the required letters are ready, perhaps sorted into piles or boxes, from which the learners will select.
· Provide each learner with a phoneme frame, that is, a board (say, a mini whiteboard) marked with a grid appropriate to the number of letters in the words to be spelled.
· Say the word, and ask the learners to repeat it.
· Sometimes further discussion will be needed. "How many sounds can you hear in that word?" "What can you hear as the first sound?" etc.
· Then they build the word into the spaces on their board.
A step on from there is to eliminate the step "Say the word, and ask learners to repeat it". Instead, learners must think of the word from a picture clue. The task then begins with "hearing" the word in their heads. At first, of course, they may well need encouragement to say the word aloud for themselves.
This learning procedure is mirrored in StarSpell.
Matching Letters and Sounds beyond single letters - Activities for Stage 3
The previous section is all about phonic skills. Staying with the Listen & Build approach, in this section we return to phonic facts. Here, the activities deal with letter-sound matches that involve more than a straight one-letter-makes-one-sound match.
Because, of course, the term "letter-sound match" masks the fact that phonemes are often represented by more than one letter: digraphs (two letters: sh, ee, etc.) trigraphs (three letters: air, ear etc.) and even quadrigraphs (four letters: augh, ough).
Learners meet certain digraphs quite early in their phonic progress: sh, ch, th, for instance, and ar, ea etc. and the concept should be introduced quite straightforwardly: "This sound" (it might be, ch, say) "needs two letters that you already know. When they come together, they lose their own sounds and join together to make this new one".
Later however, when dealing with a much wider range of letter-sound matches, learners often need practice to sharpen their understanding of the difference between the number of letters in a word, and the number of graphemes.
An activity focusing on the difference between a grapheme and a letter
This activity could also be used to introduce the term digraph.
· Have ready a list of words which contain digraphs (and later, trigraphs, quadrigraphs).
· Provide each learner with an ample supply of counters.
· Provide each learner with a board (say, a mini whiteboard) marked with a two-row grid having as many columns as there are letters in the longest word you're using in this activity.
· Display a word, on card or whiteboard.
· Say the word and ask the learners to repeat it.
· Ask and explain: "How many sounds (i.e. how many phonemes) can you hear in that word? Now, for every sound (phoneme), place a counter in one column across the top row of your board."
· And next, still with the word on display, ask and explain: "How many letters can you see in that word? Now, for every letter, place a counter in one column across the bottom row of your board."
· Discuss with your learner/s those instances where two letters work together to represent one sound.
· Clear the boards, and repeat for the next word, and so on.
· Once you've gone through your list in this way, remove the words from display, and ask your learners to write some, or all, of the words, to your dictation. For each word, recall the principle just demonstrated "Listen for all the phonemes. Have you got a grapheme for each one? Have you got more letters than phonemes? Good."
See also Session 13, Session 14 and Session 22.
Look and Learn - Activities for Stage 3
Two approaches run in parallel throughout the journey to competent spelling: Listen & Build and Look & Learn.
With the activities in this section we leave Listen & Build and turn to Look & Learn, discussed in Look & Learn in Early Phonics. The activities here link to that section.
They add refinements to the basic Look-Cover-Write-Check routine, providing support and interest for all learners, but absolutely essential for learners experiencing difficulties.
So view this section as a menu from which you can pick and mix in order to help any learner, but particularly those who need extra support.
There are three parts to this 'menu'. First, quite simply, there is the basic LCWC routine. Second, there are suggestions to turn the basic LCWC routine into a multi-sensory experience. Third, there are suggestions focusing on phonically irregular words, often termed "tricky" words. Because this irregularity is a characteristic that applies to a large proportion of High Frequency Words, this third group of suggestions adds to the first two, with further useful ideas for High Frequency Words.
StarSpell activities and the Spelling Route sets out the ways in which StarSpell reflects and complements all these off-computer activities.
The basic Look-Cover-Write-Check routine (LCWC)
A straightforward LCWC routine is a perfectly good and serviceable help to many spellers in memorising words.
· Look at the word
· Cover the word
· Write it out from memory
· Check to see if you were right.
And repeat as necessary!
Turn the basic LCWC routine into a multi-sensory experience
The basic LCWC routine can be enhanced to engage a greater number of the learner's senses:
|
Sight |
enhance the visual experience of the word |
|
Hearing |
enhance the auditory experience of the word |
|
Speech |
increase attention to the articulation of the word |
|
Touch |
add tactile experience of the word |
|
Movement |
enhance the motor experience of the word |
Expanding the basic LCWC routine in this way provides multi-sensory experience, known to be enormously helpful in memorising spellings.
The following suggestions show how the basic LCWC routine can be expanded to provide this necessary multi-sensory experience.
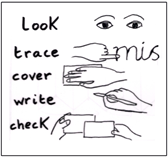
LCWC becomes LSTCWC: Look-Say-Trace-Cover-Write-Check
To LCWC, add S for Say and T for Trace to make it LSTCWC. Here is a very useful routine to follow:
· Auditory input: teacher says the word (perhaps shown written in large letters).
· Visual input: learner studies the look of the word.
· Articulation: learner repeats the word.
· Tactile-motor-auditory input, and articulation: learner traces over letters of word with finger and pronounces each sound (each phoneme).
· Memorisation and further motor input: learner covers the word and then writes it.
· Memorisation reinforced: learner checks spelling.
· Tip It helps to say "Study the word" rather than "Look at it". (So you and your learners would call it SSTCWC.)
These additions have increased the sensory experience of the basic LCWC; it's now multi-sensory.
A poster is useful, as a classroom reminderof the routine; or some learners like to have a small reminder, a card to slip in pocket or vocabulary book.
Enhance the visual experience: add to the 'Look' of Look-Cover-Write-Check
It's essential to teach learners how to look, to look with intent.
That's why it helps to say "Study the word" rather than "Look at the word".
Guide learners to look at the shape of a word
Teach them to ask themselves questions such as these:
· How many tall letters are there?
· How many letters with tails?
· Has it got any double letters?
· Can I turn the word into a picture? Such as e y e; is land?
· Can I learn it by analogy? That is, do I know other words with the same pattern? e.g. could, would, should.
Guide learners to look at the structure of a word
Teach them to ask themselves questions such as these:
· Can I see a little word inside this word? e.g. hospital = ho-spit-al.
· How many syllables can I count? So how many syllables must I write?
· Is there a prefix and/or a suffix?
Add these steps before 'Cover'
· Teach learners to pick out the hard spot ('hot spot') in the word; they need to ask "What's the 'hot spot', for me?"
· Encourage mnemonic-making. It's good if learners can invent their own mnemonic for a whole word, such as: DOES = Dad Only Eats Sweets; or for a "hot spot" in a word, such as the urs in 'Thursday' = U R Sick! Or the ould in could = O U Lovely Duck. See some Mnemonics to help spelling.
· Make the visualisation active, by suggesting "When you think you have a good picture of the word in your mind, imagine a photograph of it, look at the wall, and 'see' that photo on the wall. And if it helps you, then 'read out' its letters or its phonemes several times."
Enhance the auditory experience: add to the 'Say' of Look-Say-Trace-Cover-Write-Check
· Teach learners to say the word as they look at it.
· Stress that it should be said slowly, attending to each sound (phoneme).
· In addition, some learners are helped by saying each phoneme separately, in sequence: 'slow-motion spelling'.
· Others are helped by spelling the word out using letter names. This may seem to undermine phonic understanding; nevertheless, there are learners who find this activity to be the most helpful for them. The technique is known as SOS: Simultaneous Oral Spelling.
· Teach learners to watch out for any silent letters in the word. To help memorisation, they should sound these when they say the word: WeD-nEs-day, Feb-R-u-ary.
Enhance the tactile and motor experiences: add to the 'Trace' of Look-Say-Trace-Cover-Write-Check
This tactile element can be a very powerful addition to the multi-sensory attack.
· Make a rainbow word. Learners add visual and auditory reinforcement by tracing over the word several times in different colours; at the same time saying each phoneme or each letter-name (find out whether letter-names or phonemes best help the learner).
· Finger-trace. The basic step of tracing over the word is hugely strengthened by tracing with the forefinger, rather than pen or pencil. It adds strong tactile reinforcement.
· Finger-write the word. It isn't tracing, yet is close kin to it. It brings together visual and motor memorisations, and adds a very strong tactile element:
o Copy the word with finger on table-top.
o Copy the word with finger in salt or sand on a tray: an extremely effective technique (disappears beautifully with a shake of the tray, so multiple tries become fun, and errors never have permanent form).
o Copy the word with finger on velvet, or fine sand-paper. Give pupil a choice.
o Copy the word with finger onto the palm of the other hand.
o Copy the word by 'writing' large letters in the air; pretend you're writing with a lit sparkler.
o Copy the word with the beam of a torch onto wall, or board.
o Vary the activity. Experiment, be creative, and find what suits.
More ways to enhance the tactile/motor experiences: add to the 'Write' of Look-Cover-Write-Check
The writing of the word need not always be on paper.
Think multi-sensory: be creative in your writing resources:
· Glitter pens
· A wet cloth on a worktop, blackboard or slate
· Chalk on a blackboard
· Marks made in plasticene
· Words made from plasticene rolls
· Bright paint with a large brush on sheets of newspaper.
However, perhaps the most powerful method is writing with finger in salt or sand on a tray; there is something telling about the strong tactile input; also it encourages multiple attempts, because each can be speedily dispelled with a quick shake of the tray.
Add to the 'Check' of Look-Cover-Write-Check
Learners who need lots of practice in order to memorise should try to spell the word again:
· Perhaps a few minutes later, maybe an hour later
· Certainly that evening
· And each day for a week.
Ways to support spelling repetitions
The concertina, the three-flap book and the pest card are examples of resources that support repetitions.
The concertina
The concertina is a quick, on-the-spot ploy, providing a framework that makes practice a bit more structured. Fold a piece of paper concertina-wise as if making a fan:

With the 'fan' closed, write the practice word on the top-most outer fold. The learner goes through the Look stage of LCWC, then, for 'Cover', turns over to the first right-hand fold inside the 'fan' and writes the word, then checks back to the original model on the top outer fold. This is repeated through all the folds of the 'fan'. It's a ploy that just adds a little extra interest to the basic routine, and can be done right there and then if a significant need crops up when looking with a learner through his or her written work.
The three-flap book
The three-flap book is similar to the concertina, but more formalised. You'll need to staple or spiral-bind a little booklet, with several pages each ruled into four columns. As each page is completed, it will be removed to be filed elsewhere. On top of those pages you add three permanent flaps. The top flap is wide enough to cover the first three columns of the removable pages, the middle one covers two columns, the bottom flap covers one column:
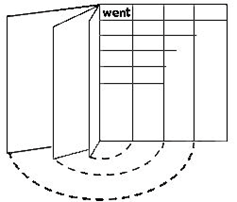
Practice words are written in column 1. The learner carries out the 'Look' stage of LCWC, then turns the bottom flap to cover the practice word written in column one, and writes it in column two. After checking the word by looking back at column one, the process is repeated using the middle, then the top, flaps. A three-flap booklet like this has been proven to provide the stable routine that some learners really welcome.
The pest card
This gives official authorisation to go out and pester! The learner has a card on which the week's target words are written. Next to each word are five (or seven) tick boxes. Each day learners must find somebody: playground supervisor, big sister, granny, to hear them spell their words and get ticks in the boxes; you will check the words once the card is complete.
Look-Cover-Write-Check and phonically irregular words ('tricky words')
Spelling as an aid to acquiring sight vocabulary
"The acquisition of sight vocabulary" means coming to recognise certain words on sight when reading, without needing to decode, letter-by-letter.
But the learning of a sight word for reading does not necessarily bring with it the instant ability to spell it. A learner may well read a word; the ability to spell it doesn't always follow.
However, focus on the spelling is immensely important in acquiring sight vocabulary, particularly for learners who don't easily memorise words on sight.
Reading and spelling come together in the learning of High Frequency Words. So the following activities rely on the close relationship of reading and spelling.
A basic sequence for learning High Frequency Words
The following activities share a sequence that takes the learner from first being introduced to a word, through a range of learning activities, to practice in recognising the word through various games, etc.
The sequence for learning High Frequency Words is as follows (we'll call them tricky words):
· Meet the word, and examine it with support.
· Continue to examine the word, for instance through matching activities.
· Make/spell the word.
· Recognise the word in isolation.
· Recognise and use the word in context.
The first four steps are detailed in the following sections
Meet the tricky word, and examine it
· Present a single word to the learner (or perhaps a short list of words for those who can take more on board). It's always best to first draw attention to it in a meaningful context, making sure its meaning is understood.
· Then present it in isolation.
· Talk about the word's features, if possible engaging the learner in finding features.
· Are there any little words inside a bigger word?
· Are there any double letters?
· Are there any letter strings shared with other known words?
· Talk about the letters' ascenders and descenders.
· Discuss any possible mnemonics.
"A tricky word" illustrates this experience.
Activities for examining the tricky word through matching
Pick and mix from the following suggestions to help the learner to look carefully at the word, and really get to grips with the look of it.
· Write out large a few very different words; for instance, that (two ascenders followed by two small letters), and (two small letters and one ascender), but (a small letter sandwiched between two ascenders). Separately, draw out their shapes. Ask the learner to match the written words to the drawn shapes.
· Upstairs and downstairs: again, write out large two sets of the same few very different words. Cut one set in two, horizontally through the middle of the small letters, so you have a set of upper and lower halves. Ask the learner first to match the upper halves to their equivalent whole words; then their lower-halves.
· Give the learner a pile of cards (or simply quickly cut domino-sized pieces of paper) with his/her words on, each one repeated on three or four cards/papers. Then have each word written large on other pieces of A4, one word to a sheet. The learner has to sort out his mixed pile of words, placing them onto the appropriate larger sheet. And if possible tell you what each pile is, when done.
· Cut a circle of card, perhaps about as big as a saucer. Cut a smaller circle about the size of a drinking mug. On each draw a number of segments to give you one segment for each of your learner's words, and maybe throw in one or two others. Write the words around the rim of the big wheel, one in each segment. Then write them again in a different order around the rim of the smaller wheel. Fix the two wheels together with a central paper fastener, so that the smaller one rotates. The challenge is to turn the smaller wheel to match whatever word you call out against its copy on the larger outer wheel.
· On a piece of A4, write the target words in a column down the left-hand side. Write each word more than once, or mix in some other words. You'll have about 10 words in the column. Now write the same words in a second column down the right hand side. Write each word opposite and level with a word in the left-hand column. But don't write them in the same order. The learner has to draw a pencil line from left-hand words across to a matching word in the right-hand column.
· Present the words written domino-fashion, two words to a card, to be laid out in a properly matched-up domino line.
Activities for making/writing the tricky word (from a written model)
With a copy of the word in front of them, learners can:
· Make the word in plastic letters.
· From a bag containing appropriate plastic or wooden letters, pull out, by touch only, the word's letters, in the correct order.
· Make the word out of plasticene 'worms', or out of Play-Doh or dough; be creative!
· Find the missing letter: pop the correct letter back into several incomplete plastic-letter copies of the word. That is, words with one letter missing; e.g. the word said: s-id, sa-d, ‑aid, sai- (make sure there are enough of the right letters available).
· Perform all the finger-writing and tracing activities in Enhance the tactile and motor experiences.
Activities for recognising the word in isolation
The following activities, here in pick and mix order, begin to be possible once learners are working on a sight vocabulary of anything more than about three words.
· Write the words large, each one on a piece of A4. Spread them around the room like stepping stones. Can learners walk the path and say the words? Try it with music, like musical chairs; they have to read whatever word they're on when the music stops.
· Have the words written large on A4 sheets pegged onto a washing line. Learners must tell you in what order to unpeg them, by saying the word and pointing to it.
· Make bingo cards, with words in the squares instead of numbers.
|
look |
can |
|
Jude |
see |
Four words, six words, whatever seems right. Make a little pile of caller cards with the words on, and some nonsense words to fill out the game e.g. zzzzzz, rrrrrrrrr, mmm, sssssssss, fffffff, nnnn. Pupils can take turns at being the caller.
· Cut out some fish shapes in card. Clip a paper clip onto each fish tail. Stick a word onto each fish on a freezer label (that lets you re-use the fish for other words, stuck over the top, next time). Then you need a stick, some string, and a magnet, to make a fishing line. The paper-clipped fish go into a basin, and have to be fished out and read.
· Once learners have progressed to a slightly bigger sight vocabulary, cover a sheet of A4 with about 20 words, written randomly and in different sizes all over the sheet. In that mish-mash, repeat each of the target words two or three times, and maybe fill out with others e.g. personal names, mummy, daddy etc. Then with highlighter pens, learners highlight one word in one colour in every place they can find it, another word in another colour, and so on.
· Snap cards. You can fill out the 'pack' that you make with nonsense words like zzzzzz etc.
· Use a whiteboard. Draw three, four or however many balloons on it, and write a word in each balloon. Each balloon is 'burst' by reading the word and then rubbing it out.
· Draw a tree on the board, or on a piece of A4. Cut out some paper apples, write a word on each apple, stick it on the tree with Blu-Tack; the challenge is to pick all the apples in as quick a time as possible (reading each one as it is picked).
· Challenge learners to read 'invisible' words. The balloon and the apple game (and probably most of the others, too) can be varied by just writing the first and last letter of the word, with a dash for each missing letter. They are able to go back to a word list to check out what the missing letters are.
· Hide the words, as in 'Hunt the Thimble', 'you're getting warmer' etc.
· Get a strongish piece of card and make five or six pencil-sized holes in it. On both sides stick freezer labels with words on, one word just beneath each hole. Make sure you have the same word labelling the hole on each side of the card. Then pupils (or adult and learner) sit facing each other with the card held up between them. The learner has a pencil. The other reads a word, and the learner has to poke the pencil through the right hole. Then the two can exchange roles. Of course the adults will be getting a lot wrong, won't they?
· Make two 'dice' from two square building bricks, but with a freezer label word on each face instead of dots. You each shake your dice, and have to read the word that shows. Any mistake and you're out.
· Draw a ladder; write a word on each rung. Draw a long enough ladder to make a worthwhile game. Shake a dice, and climb the appropriate number of rungs. You have to read the word you land on or you go back down to the bottom. Many traditional games can be adapted in this way. And you can substitute a pile of word-cards for a dice, with players moving according to the number of letters in the word, if they can read it, of course.
· A shaker box: cover a cereal box, or washing powder box (a task for your learners: to decorate it), and put into it a number of cards, each showing a target word. Learners keep those words they can recognise from cards shaken one at a time from the shaker box. Or picked out, as a Lucky Dip.
Tricky words: the collector instinct
Finally, a suggestion intended to appeal to a learner's collector instinct, but also, much more importantly, to make learning 'visible'.
Learners each have a long shoelace, ending in a bead or big knot. As each word is securely learned, it is written on a separate card about the size of a domino, with a hole punched in it, and threaded onto the lace. Gradually a visible, graspable collection of known words builds up. Hang it somewhere where the learner can be proud of this growing collection.
And the reason for all this work
Keep reading! Keep writing! Find real purposes to read and write, and maintain constant opportunities and encouragement to use the target tricky words in context.
Listen and Build - Activities for Stage 4, Further Phonics
The activities in this section link to Further Phonics.
The work of Listen & Build continues, and now involves:
· Completing the learning of all letter-sound matches
· Recognising that letter-sound matches include alternative spellings and alternative pronunciations
· Syllabification
· Understanding how morphemes work.
With this last area to do with morphemes, the stage includes the Work within Words approach.
At the same time, Look & Learn evolves to cope with the memorisation of longer words.
Finally, the skills needed in the course of 'writing for real' now play a significant part.
Completing the learning of the remaining letter-sound matches
Listen & Build work continues to complete the learning of letter-sound matches. Quite clearly, if you are to become a competent manager of alternative spellings and pronunciations then bit by bit you have to get all the letter-sound matches firmly under your belt. All have to be learned, as a body of phonic facts.
Although they've reached stage four, most learners will have some letter-sound matches still to be learned; stage three learning probably hasn't covered all.
But the strategy at this later stage, broadly speaking, is the same as for the first tier of phonic fact learning, described in Activities for Stage 3: learning letter-sound matches. Just as before, you'll begin with an introduction to the letter-sound match, and go on to activities designed to help its memorisation. However, two switches in emphasis are called for:
· When a letter-sound match is introduced, context now is absolutely vital; this is due to the effect of alternative spellings and pronunciations described in the next section (for example, if you're introducing ow, you need to be clear whether it's ow as in cow or ow as in show).
· For many learners the whole sequence can be much reduced; at this stage the game-like activities are less needed, and more emphasis can be placed on written activities.
Tip: In this teaching of new letter-sound matches as straightforward phonic facts, keep separate by a good few weeks the introductions of their alternatives. For instance, in their initial teaching, delay the introduction of ow as in show until you are sure that your learners have well and truly got ow as in cow. Apart from the reduction in confusion, it gives you a solid basis from which to introduce alternatives as alternatives.
Learning to manage alternative spellings and pronunciations
The concept of alternative spellings and pronunciations is also part of the Listen & Build approach.
The activities in this section link to Alternative spellings and alternative pronunciations.
As explained in the previous section, "Completing the learning of the remaining letter-sound matches", each alternative spelling and each alternative pronunciation has to be learned in its own right as a phonic fact.
But meanwhile, running alongside, the growing understanding of the whole concept of alternatives has to be introduced, nurtured and practised.
The following suggestions[‡‡] are based on three things that are important in getting this concept across: context, groupings and 'the alternative mind-set':
The importance of context
Just about the only way you're going to remember alternatives, whether to use meet or meat, for instance, is to remember to link the spellings to the meanings.
A key mnemonic for that is to recall the word in the setting of a memorable context.
It follows, then, that alternatives should always be introduced in a context.
The importance of grouping
Because it's difficult to find any rationale in the system of alternative spellings and pronunciations, much of the learning relies on memorising groups (or lists) of words that share the same letter-sound match. Such grouping helps you to become sure , for instance, which words use 'ow' to make the sound of ow as in cow, and which words use ou for the same sound. There are various interesting activities centring on this idea of collecting groups of words. For instance:
Friends and enemies
The idea is that words have 'friends' and 'enemies'. Friends are words that share the same letter-sound match. Enemies betray their friend by using an alternative letter-sound match to represent the self-same sound as the friend has. So, for instance, hill has lots of friends: bill, dill, fill, gill, Jill, kill, mill, pill, sill, till, will, and no enemies. Soap, on the other hand, has lots of enemies: cope, hope, dope, mope, and few friends! But 'gate' has lots of friends: date, fate, late, mate, and lots of enemies, too: great, weight, wait. Then there's bulb, all alone, no friends, no enemies. In pairs, learners are given a handful of words, and asked to compile lists of their 'friends' and 'enemies'.
Crazy words
An on-going word-study activity that may take several weeks to complete: learners are asked to spot words in their reading or their own writing, which are suitable to add to a chart that has two headings: "Fairly crazy words" and "Really crazy words". Under "Fairly crazy words" they might decide, say, to put any and guitar (only "fairly" crazy because there are other similar spellings). Under "Really crazy words" learners in these explorations might put ocean, busy, pterodactyl or psalm. Once a reasonably-sized collection has accumulated, you have the basis for a great deal of discussion: where the apparent 'craziness' of some of the words can be disproved and made a starting-point for the collection of other like words for each word, wherever possible (perhaps as a Friends and Enemies game).
Phoneme spotting
On a page of text, learners highlight a given sound in all its alternative written representations (all its possible graphemes); it may need a custom-made text.
Phoneme collecting
This is another on-going word-study activity, perhaps over one week. The "Grapheme of the week" heads a chart (let's say it is ough). Learners are asked to add words containing ough, from their reading or from their own writing. Once completed, the words are sorted into columns according to their phonemes: cough, trough; through; dough, although; enough, rough.
This class or group activity can extend to become an individual activity, with learners compiling their own word-books.
Collect "Ad-men's mistakes"
Make a collection of the alternative spellings invented for brand-names: Kleeneze, Kwiksave, SupaSava, Tuchifilli (label on a cushion!) etc.
Rhyming challenges
Learners (perhaps in teams) have a list of words, and are challenged to find as many rhymes as they can for each word but spelled differently. This can start out low-key, with words like way (weigh, grey), progressing to harder challenges such as smiles and isles, maybe even ending up at levels as giddy as terpsichore and trickery. The activity could end with the challenge to produce some verses using their words.
Tip: Rhyming dictionaries, of graded difficulty levels, are useful classroom resources.
The importance of 'the alternative mind-set'
Bring the whole concept of alternatives out into the open: describe it and explain it clearly to your learners; open it up as an enjoyable quirk of our language.
For instance:
· After collecting "Ad-men's mistakes", try to invent more; maybe make a complete shop-window display.
· Set learners to find new ways to spell their own names (Shakespeare did!).
· Challenge learners to find as many ways as they can to complete a given written word-start made up of a consonant plus single vowel-letter e.g. from ba could come bat, ball, bar, bay, bait, bare, balk.
· Secret messages: write a message for a friend, wherever possible substituting alternative phonemes.
· Short, sharp, oral group brain-storming sessions: How many ways can you think of to write the sound /ai/ as in rain? How many sounds can ough say when we write it? And so on.
Note: Homophones are important in this area of learning.
Syllabification[§§]
Listen & Build work is incomplete without developing an understanding of syllables and their importance.
The following activities relate to the section on syllabification.
About syllables
Keep in mind three key facts to do with learning about syllables in spelling, and pass these on to your learners:
· Counting-out syllables helps you be sure you've spelled every bit of a word.
· A syllable in a word is like a beat in music: you can count the syllables like you count beats in a bar.
· Every vowel-phoneme in a word indicates a syllable, because a vowel-sound is the heart of a syllable (remember it's vowel-sound, not every written vowel-letter).
Syllabification activities
Here is a menu of syllabification activities from which you can pick and mix.
Teach learners to discriminate syllables in spoken words:
· Clap and/or beat the 'beats'.
· Put their hand under their chin so that they can feel their jaw drop as they utter a vowel sound. One vowel sound per syllable = one jaw-drop per syllable, because the mouth opens with every vowel-sound.
· Put their finger on their lips (as for 'ssshhh'), as they speak the word; this is another way to feel that the mouth must open at each vowel sound.
· Circle or highlight the vowel graphemes in a written multi-syllable word, and then underline the syllables, each with a separate line. Underlining is preferable to using dividing lines, since it suggests the smoothness with which the word is to be re-built: sat is fac tionnot sat/is/fac/tion). Ask them to look carefully at the consonants that mark the syllable boundaries.
· Build words, jigsaw fashion, out of separate syllable cards
· An oral activity: generate as many words as possible from hearing a given first syllable, or first two syllables; e.g. car →carton, cartoon, carbon, cardboard, or tele →telephone, telepathic, telecommunications etc.
· Orally or written: produce a word from its definition and first syllable.
· Orally or written: complete a word embedded in a sentence, after being given its first syllable.
· Practise matching spoken syllables of a multi-syllable word with the written version, through a sequence of:
o Listening carefully to the word
o Reading it on board or screen
o Word is hidden
o Writing the word from memory, or making it with plastic letters.
Morphemes and Spelling Rules - Activities for Stage 4, Further Phonics
Activities to develop understanding of how morphemes work
Morphemic understanding belongs to the Work within Words approach which runs alongside Listen & Build and Look & Learn. The following Work within Words activities link to the sections Syllables and morphemes: the distinction, and Morphemes and Working Within Words.
Here are some game-like activities to promote the discovery of morphemes; and the junctions where morphemes join the stems of words. The activities link to the next section So-called spelling 'rules' discovered as probabilities.
Word assembly
· Early activities might involve play to form plurals, and to change tenses by adding ‑ing or ‑ed (physically, with morphemes on cards).
· Later, person-games are helpful "Someone who cleans is a cleaner, runs → runner, drive → driver". When this deals with the ‑cian ending (musician, magician, electrician, technician), and learners see its connection to the -ic ending of music, etc., they have a great preventative against ever writing musition.
· Add suffixes to convert adjectives to nouns (sad →sadness), verbs to adjectives (forget → forgetful), adjectives to adverbs (glad → gladly).
· Introduce abstract nouns as above (imagine → imagination).
· Play with invented words: 'unbreak', 'dismend'.
Word dis-assembly
Use all the suggestions under Word assembly, in reverse.
Count the morphemes, count the syllables
· As for syllabification, underline the morphemes, each with a separate line. Underlining is preferable to using dividing lines, because it suggests the smoothness with which the word is to be re-built: un happi ly Ask learners to look carefully at the junctions: the points in the word where the morphemes join on.
· Play games: team games, races, to count the number of morphemes in a word.
· Make charts for lists of words, to compare the number of morphemes in any one word with the number of syllables.
Word webs
Create a word-web by seeing how many words can be generated by adding affixes to a given stem. For instance, the stem sign in the centre of the web might generate signature, signatory, consignment, assign, assignment, design, signal, signalling. It's interesting to arrange these in linked groups as a web or spider-diagram, around the stem sign, to reflect either meanings, or words with prefixes, or words with suffixes, or whatever links the players come up with.
Analogies
Get learners thinking for themselves as to what spelling behaviour links an apparently random collection of words: can they spot words behaving similarly? That is, can they make analogies between one word and others? For instance, you might hand out a mixed list of words with the …ing suffix use words like jumping, diving, hitting, dancing, leading, scoring , thudding, winning and ask learners to sort them into three groups according to a spelling criterion that you are leaving them to discover (1. jumping, leading; 2. hitting, thudding, winning; 3. diving, dancing).
Classifying words
Similar to the Analogies activity, but here players are handed the spelling behaviour. For instance: "Put the words that behave like hope/hoping in the red tray; in the green tray go all those that behave like hop/hopping."
So-called spelling 'rules' discovered as probabilities
There are three key recommendations towards helping learners understand spelling 'rules':
· Talk about 'generalisations' or 'regularities (or 'probabilities') instead of 'rules', because for every 'rule' there are exceptions.
· Help learners discover 'regularities' for themselves: present lots of examples, with time to think about them, play games with them, and discuss them. Help learners journey from investigating a 'regularity' to recognising it, not vice versa; journey from practice to a theory discovered personally.
· Provide opportunities for the consolidation and application of learned 'regularities'.
Look and Learn - Activities for Stage 4, Further Phonics
As in each stage, here in Further Phonics, the Look & Learn approach plays an important part. See also Look & Learn in Further Phonics.
· Learners are now dealing with longer words; in many words, there will be a particular tricky bit, the hard spot (or "hot spot"). Look & Learn helps learners focus on such strings of letters within words. The ideas already set out in Activities for stage 3 of the Spelling Route: Look & Learn remain perfectly valid at this stage. Only the complexity of the words changes.
· It's difficult to find any rationale in the system of alternative spellings and pronunciations; therefore much of the learning simply calls for memorising groups (or lists) of words sharing the same letter-sound match. Indeed, the list of words matters here as much as the isolated letter-sound match. To re-use an example given earlier, lists help you to become sure which words use ow to make the ow sound as in cow, and which words use ou. Look & Learn lends itself admirably to meeting that need: for example, one way to give a list of similar words a three-fold practice run is via the three-flap book.
Proofreading and Editing - Activities for Stage 4, Further Phonics
Writing for real: drafting, proof-reading and editing
Writing for real with its drafting, proof-reading and editing, is described in Further Phonics and Beyond Phonics.
The following ideas sketch out various ploys that help create a shared view of steps in the writing process: drafting → proof-reading → editing.
Drafting
Ensure that learners are allowed to write their ideas freely, uninterrupted by attention to spelling. Here are two suggestions to support this.
· The Magic Line technique for younger pupils. Train pupils to keep going when they are producing a piece of writing, carrying on past any spelling problem by simply spelling as much of the word as they can (perhaps the first letter/last letter) and drawing a Magic Line for the bit/s of the word they're puzzling about.
· The 'exonerating' technique for older pupils. Tell older writers they are exonerated from having to get every spelling right while they are in the throes of getting their ideas down on paper. As with Magic Line, they can draw a line, or add asterisks, to indicate a problem spelling, but their writing isn't hampered by editing considerations at that point.
Both techniques are designed to keep up the flow of ideas; what's more, they actually replicate the way 'real writing' is done.
Of course, just as for 'real writers', that's not the end of things. A draft has been produced, which must be proof-read.
Proof-reading
Proof-reading skills must be demonstrated and taught. (Now attention to spelling has its place.)
To demonstrate, you yourself produce a piece of writing with some five or six errors (this spares any learner the embarrassment of having their work scrutinised). Put your work up for all to see. Tell the group how many errors there are. Together decide on the symbols you will use to mark different types of errors. Work through it together, encouraging discussion about possible spellings for the spelling errors. Later, show an edited version beside the proof-read version.
Promote a framework for proof-reading and editing
· Leave some space of time between writing the first draft and proof-reading; preferably the next day.
· To help spot errors:
o Encourage the reading out loud of the passage at first attempt.
o Show how to place a ruler under each line to make sure no line is left out.
o If it's not a very long passage, sometimes it helps to read it through word-by-word from the end; that way attention goes purely to the spellings, not the meaning.
· Teach a routine for the thinking that needs to go into correcting spelling errors; teach learners to:
o Think about the word's meaning: does it give any clue?
o Say the word slowly; listen to the sounds.
o If it's multi-syllabled, write it syllable by syllable.
o Check: have you written every sound? Every syllable?
o Think: could there be an alternative spelling?
The have-a-go card is a useful resource: a great aid when younger pupils tackle proof-reading for themselves. The card has three columns. At proof-reading stage, writers select some five or six words of which they are unsure, or which they've already magic-lined, noting them in column 1. In column 2, after being allowed some time dedicated to thinking about the spellings, they "have a go" at spelling it. Column 3 is for the correct spelling, which may have needed conference time with teacher. A collection of have-a-go cards, or a have-a-go pad, serves as a useful record of learning.
A useful mnemonic for proof-reading is C.O.P.S: Capital letters, Omissions of words, Punctuation, Spelling.
Dictionary skills have to be taught, too, for effective proof-reading.
Tip 1) Don't forget the thesaurus. Learners, who can't find a word in a dictionary because they don't know the opening graphemes, can use a thesaurus instead. For instance, the spelling of automobile can be found in a thesaurus under car, as can, say, disease, under illness. (Choose a thesaurus at an appropriate grade; there's a good selection to be had.)
Tip 2) Spellcheckers have their uses, but beware. They also have their pitfalls, as the following verse demonstrates:
I have a spelling checker
It came with my PC
It plane lee marques four my revue
Miss steaks I cannot sea
I've run this poem threw it
I'm shore your pleased too no
Its letter perfect in it's weigh
My checker tolled me sew[***]
Not one of those errors shows up on a spell checker. A need for Work within Words!
Beyond Phonics - Activities for Stage 5
The activities in this section relate to Beyond Phonics.
As the name suggests, the work of Listen & Build is largely complete, giving way mainly to word study, as part of the Work within Words approach. Learners are helped by study of:
· Words imported from other languages
· Word origins
· Homophones, and near homophones
· There is still some need for look & learn
· The skills needed in the course of 'writing for real' are extremely important.
Ideas for areas for study are shown in Beyond Phonics.